Sunday, 27 March 2011

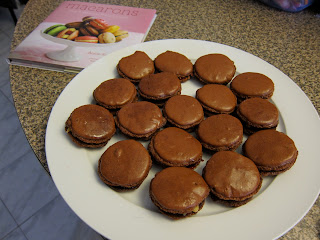
chocolate macarons with peanut butter & raspberry jam

My fascination with macarons means that I have at least 6 cookbooks dedicated to making them, constant stalking of Adriano Zumbo to see what new macarons he's got in store and of course, a sizeable appetite for eating them. For awhile, I've been planning to do the course at Baroque Patisserie but after many unsuccessful attempts at booking myself a place, I ended up giving it a go at home and you know what, it actually wasn't too bad. Never has my fascination with 'feet' been so great that I actually squealed in delight watching the feet form on my macarons whilst they baked in the oven!

Start with 200g icing sugar and 100g ground almonds and blend thoroughly for 30 seconds in a food processer. For chocolate flavoured macarons, add in 2 tbsp of cocoa powder and blend.

In a large bowl, place 120g egg whites (approx. 3 eggs) and add a pinch of salt. Using a handheld electric beater, beat until they will only just hold a stiff peak. Continue to wish at medium speed whilst adding 40g caster sugar a little bit at a time. Keep in mind that the mixture should be thick, white and glossy. Add a  little red food colouring paste to boost the colour of the final macaron.

Using a large metal spoon, fold the ground sugar, cocoa and almond mixture into the egg whites. The mixture should be thoroughly incorporated and smooth.

Fill a piping bag with the mixture and pipe evenly sized rounds onto a baking sheet. Tap the bottom of the baking sheets sharply once on the work surface to expel any large air bubbles. Leave to rest for at least 15 minutes and up to 1 hour until they have set and formed a dry shell. They should not be sticky to the touch. Preheat oven to 170 degrees.

Whilst the piped macarons were resting, I made my peanut butter filling. To make the filling, put 75g skinned and unsalted peanuts in a roasting pan and toast in the oven for  minutes. Remove from the oven and leave to cool for 2-3 minutes before finely chopping in the food processor. 

Add in 1 tbsp icing sugar, 3tbsp condensed milk, 2 tbsp unsalted butter and a pinch of salt and pulse again until the mixture turns to peanut butter. 

Bake the macarons for 10 minutes. Recipe recommends that you do this one tray at a time (as the bottom of the oven is oven hotter than the middle of the oven). I take risks and look, my macarons have feet!

After 10 minutes, you should leave the macarons to cool on the tray. On the RHS is a macaron disc which I hurriedly pulled off the sheet as soon as it came out of the oven. With 5 minutes rest, the macarons actually come off the sheets much easier (see the one on the LHS).

Once the macaron shells have cooled, fill with your choice of filling. 

I had mine with peanut butter and jam. The peanut butter recipe could've done with a bit of tweaking - ending up being a little hard and chewy.

I guess not bad for my first proper go at making macarons! I'm very much in love with macaron feet as bizarre as it sounds. I've learnt my lesson to sift every ingredient that I use - the main problem I had was clumps in the batter which meant I was trying to pull these out once they were piped (hence why you see the uneven surfaces on my macarons). Admittedly it's a lot of work to make a small batch of these little things but very worthwhile and satisfying throughout and at the end!

Monday, 7 March 2011

my picnic basket

I've been wanting a picnic basket for  awhile now. The boy kept saying I was silly to get one and yes, I do admit that it's a little old fashioned but hey, who doesn't like the idea of a picnic? And like most boys, they say one thing and do another - guess what the boy got me for Valentine's Day this year?

This picnic basket set has glass plates and cups. The wicker itself is quite delicate but I love how authentic this basket is, complete with buckle straps to close.

Prawn, Spinach & Garlic Aioli Baguettes for lunch.

Fresh homemade lemonade to accompany the baguettes.

Blueberry with Orange Juice jellies & Strawberry with Cranberry Juice jellies to complete lunch.

A big thumbs up to the boy for preparing the picnic (I was quite stoked to find that he'd prepared everything himself - so much for him saying that he can't cook!) There were a lot of baguettes which could've fed four quite comfortably and as insistent at the boy was for me to eat up, we couldn't quite finish them.  It was a shame that the weather wasn't great to go outdoors but the picnic was just as nice indoors. Definitely more picnics coming up soon!

Thursday, 3 March 2011

apple & cinnamon crumble cake

Seems like everyone is getting married in 2011; I wonder if it's a particularly auspicious year or if it's just sheer coincidence. I was at a high school friend's wedding the other weekend and sitting at my table at the reception was one couple that got married a few weeks a ago, another couple getting married and having their reception at the exact same place in 1 weeks time, and then there was another couple having their wedding in 3 weeks. The fourth couple i.e. my best friend was there with her husband, leaving myself and one of my girlfriends (as they boy hadn't been invited) to look at each other in every effort not to feel a little odd. 

Anyhow, in tandem with weddings are kitchen teas and hen's nights. For this particular girlfriend who was getting married, her maid of honour offered up her place to host the kitchen tea where all guests were invited to bring a dish to share. I ended up making an Apple & Cinnamon Crumble cake the night before to bring along.

The actual recipe is for a Pear & Ginger Crumble Cake from Linda Collister's 'Cakes & Bakes from my mother's kitchen'. With a few little twiddles, you have yourself a new cake recipe and I'm quite partial to the combo of apple and cinnamon.

Preheat oven to 180 degrees. First make the crumble topping - Place 60g plain flour and 1 tsp ground cinnamon in a bowl. Add 50g cold unsalted butter cut into cubes and quickly rub it into the flour with your fingertips. Add 3tbsp light brown sugar and rub again until the mix resembles coarse sand. Refrigerate until needed. In a large bowl, beat 125g softened unsalted butter and 125g caster sugar with an electric mixer until pale and creamy. Add 2 eggs, one at a time and beat well with each addition. Tip in 125g plain flour, 2tsp baking powder and beat for 1 minute until the mixture is smooth. Spoon the mixture into a prepared cake tin and level the surface. Peel and core 2 apples and mix in a bowl with 1 tbsp freshly squeezed lemon juice. Arrange on top of the cake.

Sprinkle over the crumble topping and bake in the preheated oven for 40-45 minutes until the cake is risen and golden on top.

Leave to cool slightly before removing from the tin and cutting into slices.

Store in an airtight container in a cool cupboard or the refrigerator and eat within 2 days.

This cake is very moist and packs a punch with flavour. Only downside is that the cake doesn't seem to keep very well. Despite placing in the fridge, it was moldy by the third day (so the recipe is quite right about eating this one within 2 days!) I think the original recipe for pear and ginger is worth a try; it's been awhile since I've made a ginger recipe!

Tuesday, 1 March 2011

honeyed anzac biscuits

Since I've been sick, the one thing I've craved for more than anything else is honey - it automatically soothes the throat and makes my day feel just that tiny bit better. And if you are after proof that I've been eating up lots of honey, our 500mL squeezy jar of honey is on it's last drizzles. And I need to actually make a trip to the supermarket and get myself a new squeezy jar. I fear that if I have no honey in the house, things might get a little odd!

Just happens to be that in the February issue of Delicious, there was a recipe for 'Honeyed Anzac Biscuits'. Recipe is by Matthew Evans and there's a cookbook by this very gentleman that I have by beady eye on!

Preheat oven to 160 degrees. Line 2 baking trays with baking paper. In a small saucepan, heat 125g chopped unsalted butter and 2 tbsp honey over medium heat and stir until combined. Remove from heat and stir in 1 1/2 tsp sifted bicarb soda.

In a large bowl, combine 100g rolled oats, 150g sifted plain flour, 200gs caster sugar and 70g shredded coconut. Pour the honey mixture and stir to combine. If the mixture is very dry and crumbly, add 1-2 tsp water.

Place 1 tbsp mixture on the prepared trays for each biscuit, spaced at least 4cm apart.

Bake for 12-14 minutes until golden.

These Anzac biscuits are chewy as traditional Anzac biscuits should be (and that's just the way I like them). The colour on these is also great and really you won't feel too guilty gobbling up a few of these. The honey is a most welcome change to the traditional golden syrup used in most Anzac biscuit recipes and with my latest honey cravings, that's even more of an excuse for me to stock up on a supply of honey!