Monday 28 June 2010

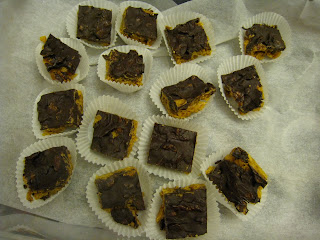
choc. nut cornflake slice

Growing up, I was a big fan of Cornflakes. I'd have it for breakfast with milk, occasionally I'd chop in some strawberries or have it with a bit of banana. Then there were the cornflake crackles that you'd have at birthday parties or at school bake sales and they were certainly made all the better with a bit of chocolate - and I think this was were my head was at when I decided to make this batch. It's been ages since we've had a box of Cornflakes at home and well, doing this catering thing, I found out exactly how handy it was to have a box of this in the pantry.

I marked up a whole heap of recipes when I was planning for the catering and this happens to be one of the first few - a choc. nut cornflake slice from AWW 'Macarons & Biscuits'.

Grease and line a 20x30cm pan with baking paper extending 2cm over the sides. Combine in a saucepan/pot, 125g coarsely chopped butter, 1/2 cup caster sugar, 1/3 cup golden syrup and 1/3 cup peanut butter. Measure out 4 cups of cornflakes.

Bring the ingredients in the pot to a boil. Reduce heat; simmer uncovered without stirring for 5 minutes.

With a metal spoon, gently stir in the 4 cups of cornflakes.

Spread the mixture into the lined pan; press firmly. Refrigerate for 30 minutes or until set.

Melt 350g dark chocolate and spread over slice.

Let to set at room temperature. Cut into slices with a sharp knife.

Place in patty cake liners to serve.

I actually didn't follow the recipe in the book exactly as I didn't have crunchy peanut butter at home but to be honest, I thought these tasted just fine. Nuts would've given it the extra crunch but if anything, the only thing I'd really change about this recipe is upping the chocolate to at least half a kg. 350g was barely enough to scrape over the top of the slice and I was lifting the chocolate out of the pockets in the cornflakes to make sure there was enough to go around.

As you'll see in my next couple of posts, I used a lot of patty cake liners for the catering. These were great for slices; it dressed them up, made them easy to handle and personally, I think they act like a mini plates (which means you gave save on a serviette. They're quite cheap too, only about $1.20 for 100). Next time I might try to get some assorted coloured ones to make it nice and colourful!

Saturday 26 June 2010

green tea financiers

The boy has a crazy obsession with friands which I don't quite get but then again, I'm just as obsessed with baking with green tea that it only makes sense to combine the two and make a green tea friand! (or if you're French, you'd call it a financier...either way, same thing.) Ah...lovely lovely green tea!

This recipe was a little different from any other friand recipe I'd come across. It had the addition of cornflour, which in the end gave the friand a much firmer texture compared to the crumbliness of a regular friand. 

Preheat oven to 220 degrees. Lightly grease 10 holes of a friand pan. Brown 130g unsalted butter in a small saucepan over medium-low heat, whisking frequently until golden brown in colour. Let to cool.

This recipe is out of 'Okashi' and has had a major rewrite. I started with Step 1, went to Step 4 and back to Step 2. Anyone else with this book, do you find that the steps happen out of order for all the recipes?

In a large bowl, beat together 130g egg whites, add 130 sifted castor sugar. Add 50g ground almonds. Then sift in 50g flour, 5g cornflour, 1/2 tsp baking powder and 10g green tea powder.

Add browned butter to flour and almond mixture and mix well.

Fill your friand pan.

Bake for 10-15 minutes until lightly golden in colour.

Remove from pan to cool on a wire rack.

I think I slightly overdosed on green tea powder with this one. As I was at the end of the pack, I'd measured out the 10g and threw in what was left, probably not so good (made these a little bitter) so I suggest you stick with the 10g that the original recipe recommends if you're planning to try this one out. And do just fill the pan to half way and not any more. I've already slightly filled mine over half way and I get the exploding tops which aren't the prettiest things to look at. 

Still not so sure about the cornflour though. The next day, these were quite hard unlike the friands I make without. Anyway, I'm slightly dazzled by a collection of green tea recipes I found in one of mum's books; anyone for green tea tiramisu? green tea and white chocolate scones? green tea pannacotta or maybe even a green tea chiffon cake? Well I bought myself a new tub of green tea so will be on the case!

Tuesday 22 June 2010

chocolate almond cookies

If you read my post on the green tea sable cookies and aren't a big fan of green tea, can I tempt you with a Chocolate Almond combo? I started this batch whilst the green tea logs were in the fridge and it all worked out quite nicely. Just as I mixed up this batch and rolled them into logs, the green tea logs were ready to come out of the fridge, sliced and into the oven. Once the green tea ones were baked, out came the chocolate almond ones from the fridge and into the oven. Tray after tray came out nicely from the oven until a little overconfidence made me burn a tray right at the end (and unfortunately had to be binned).

This is another recipe from Keiko Ishida's 'Okashi'. The recipe I'm posting is a bit of a rewrite of the recipe from the book and quantities have been doubled. I wasn't happy with the order of her instructions and have simplified them for those keen on trying it.

Preheat oven to 150 degrees and bake 80g blanched almond slivers for 20 minutes. In a large mixing bowl, mix together 240g softened unsalted butter, 140g sifted icing sugar and a pinch of salt. Add 2 egg yolks and mix well.

Fold in 40g sifted cocoa powder and 300g sifted plain flour.

Add in toasted almond slivers. 

Shape the dough into logs and wrap in baking paper.

Increase the oven temperature to 160 degrees. Once logs have firmed up, take them out of the fridge. Roll edges in granulated white sugar. Cut dough into 7mm thick slices and place on a baking tray lined with baking paper.

Bake for 20 minutes and remove from heat and leave to cool on a wire rack.

Here on the LEFT hand side are the GOOD cookies, on the RIGHT are the BAD ones. You can hardly tell from the top but once you flip them over, you can see how burnt the BAD ones are. Unfortunately the burnt taste overpowers the cookies and renders them inedible. I tried eating them, even went to the extent of convincing my brother to have one but he went straight for the non-burnt batch. Well, this is a clear example of what happens when you are overconfident and leave your oven unattended!

These cookies are nice and chocolatey and short in taste. Personally, I would recommend more almonds as 80g seemed rather sparse when mixed in. However, between the green tea and this batch of cookies, I'd say that the green tea ones are still my favourite. If you are planning on trying this recipe, I beg you, please keep a watchful eye on these when they bake. If they are looking ok, pick one up and check the base of it to see how far it's browned. Above pic is a guide to what they should look like and what they shouldn't. 

Saturday 19 June 2010

green tea sable cookies

So I mentioned earlier that biscotti keep for about a month, well these Green Tea sable cookies have a slightly shorter lifespan. They only last about a week but a week of goodness nonetheless. Green tea/Matcha is actually my favourite baking ingredient; it pairs fantastically well with white chocolate and tastes just as good as a key ingredient by itself. I love a green tea latte, Starbucks and Gloria Jeans used to have an Iced Green Tea Frappaccino (slightly sad that they longer have it), I even love cold green tea, Ichibanboshi do a mighty Iced Green Tea Cappuccino, well you get the gist of it, I do love my green tea!

This recipe has been taken out of Keiko Ishida's 'Okashi - Sweet Treats made with Love'; a gorgeous collection of Japanese inspired baked treats that I get hungry over just flipping through the pages! The recipes need a good read through before you make a start as I find a few of the steps in the recipe happen a bit back to front. Below is my rewrite of how I went about making it.

Beat together in a large bowl 150g softened unsalted butter, a pinch of salt and 130g sifted icing sugar until softy and creamy.

Add 2 egg yolks and mix well. Add 240g sifted plain flour and 15g sifted green tea powder to the mixture and fold in with a spatula. Cover the bowl with plastic wrap and place in the fridge for about 15 minutes.

Divide the dough in half and roll out two large logs (about 3.5cm in diameter) and wrap in baking paper. Refrigerate until firm.

Preheat oven to 150 degrees. Take logs out of the fridge and dip edges in granulated sugar. 

Cut logs into 7mm thick rounds.

Place cookies on a lined baking tray. Brush a little egg white over the cookies.

Bake for about 25 minutes and then remove and leave to cool on a wire rack.

I'm probably going to sound a little biased but I love these green tea cookies! They had just the right amount of sweetness to balance the bitterness of green tea and well, I really had to keep an eye on myself (and my brother) and stop ourselves from eating through the whole batch. 

As for any tips and pointers, do keep an eye on these when they're in the oven. If they start to brown, they will brown very quickly so get them out of the oven; don't walk away. At the end of the 25 minutes, don't worry if they are still looking a little soft. Take them out and the residual heat inside the cookies will make them cook further when you have them standing out to cool down. Enjoy!

Wednesday 16 June 2010

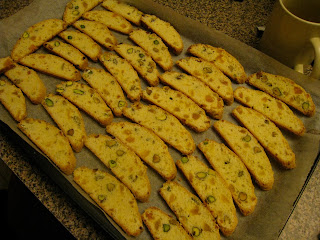
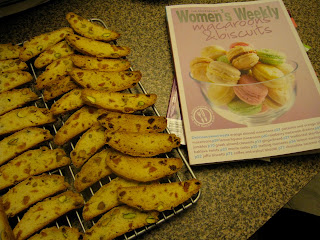
rosy apricot & pistachio biscotti

If you're looking for a trusty biscotti recipe, look no further, I think I have just the one for you. I can't say that I'm a pro at making biscotti but I have tried a handful of them and so far this has worked the best. It might come as a bit of a surprise but rosewater, apricot and pistachio make a lovely combination and being someone that has always found rosewater too sweet, I've definitely changed my mind.

It was actually after making this batch of biscotti that I had the funniest of conversations with my younger brother. I'd come home the next day with my brother asking me whether he could eat the biscotti. Of course I said yes (I'm of the mindset that food is made to be eaten and you can always knock up another batch). His response was one that I'll remember forever, 'Ok cool, we'll I've already had two' and just as he's saying the words, he's opening the container to grab another handful to munch on. I just laughed.

Preheat oven to 180 degrees. Line an oven tray. Whisk 220g caster sugar and 2 eggs in a bowl. Stir in 200g sifted plain flour and 50g sifted self raising flour.

Add to the mix 55g chopped dried apricots (I'm finding the Mezzaluna incredibly handy! I learnt about this watching way too many episodes of Nigella in the one sitting), 45g unsalted roasted pistachios and 4tsp rosewater.

In the bowl, use the spatula and shape the dough into 2x 30cm rolls. You'll find the dough a little bit stickier than the last 2 recipes I've posted. Refrain from adding extra flour - you just need to trust me on this one. Bake for 30 minutes.

Cool on tray for 10 minutes. Reduce oven temperature to 150 degrees.

Using a serrated knife, cut logs diagonally into 5mm slices. Place slices on lined oven trays and bake biscotti for about 20 minutes until, turning halfway through baking.

Cool on wire racks.

In case you were wondering, my last 3 biscotti posts have been adapted from The Australian Women's Weekly 'Macaroons & Biscuits' book. Might I say a rather pretty book which I couldn't help myself buying even though I more or less have all of the Women's Weekly recipes. I have a few more recipes coming up that I've adapted from the book and well, if my opinion is anything to go by, this is a great book to have around when planning catering for an afternoon tea. 

Tuesday 15 June 2010

citrus coconut biscotti

For those wondering, my little catering do went extremely well a couple of weeks ago. Between my aunt and I, we filled up 6x 50ml containers full of food and we had a load of fun. We were cooking, baking, and packing to the last minute and when everything got picked up, both of us exclaimed 'That was a whole lot easier than I thought!' So if you have any catering you need assistance with, do leave me a message. My aunt and I (plus my mum) make a rather good team!

I've actually lost count as to how many things we ended up making. I started prepping things about 2 weeks before, I even took a day off work and on the day before, was still contentedly baking my life away. To be honest, I felt a bit lost when all the baking was done and all the food was collected; I ended up baking a tray of muffins afterwards just because I had the itch to keep baking.

Anyway, let me share with you the recipe for Citrus Coconut Biscotti. This was 1 of the 3 types of biscotti that I made. The great thing about biscotti is that it keeps well and you can start doing your baking in advance (immediately helpful when you have a lot of people to cater for and there's just one of you!)

Preheat oven to 180 degrees. Line an oven tray. Whisk 220g caster sugar and 2 eggs in a bowl until combined. 

Stir in 200g sifted plain flour, 50g sifted self-raising flour, 80g dessicated coconut and 2 tsp finely grated lemon and orange rind.

Mix to combine.

Mould dough into 2x 30cm logs. Place logs on tray. Bake for 30 minutes and then cool on the tray for 10 minutes.

Reduce oven temperature to 150 degrees. Using a serrated knife, cut logs diagonally into 5mm slices.

Place slices in a single layer on lined oven trays. Bake biscotti for about 20 minutes until dry and crisp, turning halfway through baking.

Cool on wire racks.

Once cooled, store in an airtight container. Biscotti will keep for at least a month.

This batch of biscotti turned out a little browner than I would like but any earlier out of the oven, they wouldn't have cooked through. The recipe I've given above already has the oven time reduced by 10 minutes but see how you go. Best to stay by the oven and watch them whilst they bake. I was very much the eager beaver and stood by the oven for the whole time just to make sure that these weren't burnt to a crisp (trust me, it's happened before and I get into a rather foul mood if I have to bin the whole batch).

Anyway if I can share any advice re. catering, it's good to start early. Plan how you're going to use your kitchen in the lead up to the event. Baking these biscotti was a good call. It meant that I had a wider selection of goodies to offer on the day and well, you get to spread the cooking/baking out over a couple of weeks. Next post is another biscotti recipe; probably my favourite of the three that I made. Stay tuned!