Saturday, 30 April 2011

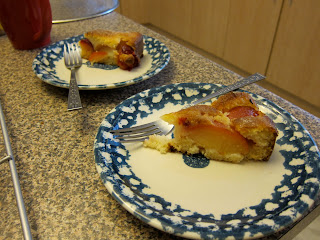
plum tea cake

So you might have heard the saying, 'When life hands you lemons, go make a gin & tonic'; I remember first seeing this print on the shelf at the Donna Hay General Store and was very tempted to pick it off the shelf until I realised that it was actually part of the display. Well, life hasn't quite handed me lemons but I do seem to have a bit of a lemon of a phone. Have tried to go get it fixed but after several times trotting over to Nokia & Optus, I've just given up. On my last visit, my efforts were so half hearted that I ended up trotting into a bookshop and buying myself a cookbook - much better. 'When life hands you a lemon phone, go buy a cookbook!'

The cookbook I picked up was 'The Thrifty Kitchen' by Suzanne & Kate Gibbs. Only $12.95 from one of the discount bookshops in Parramatta and yes, I know, another cookbook for me but really, it's a rather good one. Lots of staple recipes for the every day and scattered with cooking tips for the home. I've made two recipes from the book so far and here's one of them for a plum tea cake.

Preheat oven to 190 degrees. Butter a 20cm diameter cake tin and line the base with baking paper. In a medium sized bowl, using an electric mixer, beat 1 egg white until stiff peaks form, then mix in the egg yolk. Gradually add 1/2 cup caster sugar, 1/2 cup milk with 1/2 tsp vanilla extract and beat well. Stir in 1 cup sifted self raising flour and 30g melted unsalted butter. Pour the mixture into the prepared tin and top with 4-6 cut plums (cut side down).

Bake for 35 minutes, or until a skewer inserted into the centre comes out clean. Make yourself a cup of tea in the meantime (well I do anyway).

Remove from the oven and whilst hot, brush the top with 20g melted butter. Sprinkle with cinnamon (1/2 tsp) and sugar (1 tbsp) mix. 

Cake innards!

Serve warm or at room temperature.

This cake is best eaten on the day it's made. Personally thought it was a rather good recipe to use up some plums that were rather sour. The sourness seems to be balanced out by the sweetness of the cake. 

Sunday, 17 April 2011

malted chocolate macarons

I can't wait till Easter! A bunch of us are going camping and I can't wait to get out my wellies out of the cupboard, pack my books and kick back by the campfire and just read away. One of my drunken friends will probably holler by my ear (that's if it's not the boy himself) but it'll be a great weekend away as always; always good fun and full of laughs.

So where did the last couple of weeks go? I had a weekend away, work has kept me busy, lots of catch ups and generally being busy out and about and if you haven't gathered already, I'm looking forward to the break coming up and it wasn't so long ago since my last break. Oh well, I'm getting old and I'm getting a tidbit lazy and holidays are good, I can rest and just maybe, I might have some time to whip up another batch of macarons (being my favourite things in the world at the moment).

Here are my piped shells for a batch of Malted Chocolate macarons. Recipe is as per my last post, instead of the cocoa powder, you replace with 2 tbsp malted milk powder (remember to sift all ingredients).

I recently discovered Green & Black's Organic Cocoa Powder and really, there's no turning back.

Lightly dust the cocoa powder over the piped shells whilst the tops are still sticky. Leave to rest for 15 minutes - 1 hour until a skin forms across the shells.

Feet!

These Malted Chocolate macarons had a chocolate ganache filling in them. To make the chocolate filling, put 150g dark chocolate into a small heatproof bowl. Put 150mL double cream and 1 tbsp light brown sugar into a small saucepan and heat until the sugar has dissolved and the cream has come to a boil. Add a pinch of salt and 1 tbsp malted milk powder to the cream and pour over the chocolate and leave to melt. Stir until smooth and leave to set and thicken before using.

I could've been a little more generous with the ganache filling but was trying to be good.

These macarons were looking much better to my last batch. The feet were slightly more uniform and contained. Tastewise, they're still a little chewy and talking to a few people now, they think I should try the Italian meringue method which is apparently more stable and produces better textured macarons. Thanks for one of the boys at work, I actually got a hold of an Adriano Zumbo recipe which I'm definitely trying.

Nonetheless, this batch of macarons got gobbled up very quickly after they were made. The recipe itself is also so easy compared to the Italian meringue method which makes it hard for me to give it up (especially when I'm getting feet so easily every time!), thumbs up to the lovely Annie Rigg and her lovely book. Chocolate & Cherry macarons is sounding rather tempting as does Banoffee - what flavour to make next?