Saturday, 30 January 2010

caramel slice

I think I must've chosen the hottest day to make these but I was eager to bring these along to our NYE bash. The recipe wasn't hard and in normal weather conditions (i.e. under 30 degrees), the recipe would probably work but in my case, I was dealing with 30 degree plus heat and a special piece of equipment was required to get this one happening in my alloted time that day I'd allowed for baking. And what would that be? Well, it was my trusty old fan and I couldn't have done without it and so I've altered this recipe by adding a fan to the list of ingredients. Don't laugh at me!

Ingredients: Base - 125g plain flour, 1 tsp baking powder, 90g dessicated coconut, 115g caster sugar, 125g melted unsalted butter. Filling - 100g unsalted butter, 100g brown sugar, 400ml tin condensed milk, 2 tbsp golden syrup, 1 tsp vanilla extract. Topping - 150g dark chocolate. Most importantly, grab yourself a fan to help you get through the following instructions.

Preheat oven to 180 degrees and lightly grease and line an 18x28cm baking tin. Sift the flour and baking powder into a large bowl, add the coconut, sugar and butter and stir together.
Press firmly into the base of the tin and bake for 12 minutes, or until lightly golden.
To make the filling, put the butter, brown sugar, condensed milk, golden syrup and vanilla in a saucepan over low heat.
Cook, stirring, until the sugar has dissolved (my own tip - make sure you don't have any sugar crystals sitting on the side of the pan/pot as it will burn very quickly). Bring to the boil, then reduce the heat to low and cook, stirring for 5 minutes (until light golden).
Pour evenly over the cooked base, then return to the oven and bake for 10 minutes.
Set aside to cool completely. Time to turn on the fan and put this one in front of it.
Once the caramel is cool, put the chocolate in a heat proof bowl over a saucepan of gently simmering water, stirring occasionally until the chocolate has melted. Spread the chocolate evenly over the caramel. Place back in front of the fan to get the chocolate to set.
Once the chocolate has set, cut into squares (I managed to get 24 out of this batch).
I ended up putting each slice into a muffin holder (which I think is a great idea when you're handling it - if you have warm hands, you don't need to worry about melting the slice when you're eating it).
The recipe actually suggests sprinkling the slice with some sea salt (e.g. Maldon sea salt). I didn't have any on me at the time but I did end up buying a pack of Maldon sea salt after seeing it on sale at the supermarket; so maybe next time!

These caramel slices were so deliciously rich that most of us that night only managed to eat the one and I would recommend the one slice at a time as they can be a bit tooth-achingly sweet. The whole exercise of making caramel slices actually turned out much easier than I thought; I'm not sure why I always thought they were hard to make. Anyway, I'm busily baking away, more recipes to follow!

harumi's baked cheesecake

I've had a smooth run with the baking lately with everything turning out well and better than expected. I guess work has given me a bit of a breather so until I get busy again and get too tired to bake, I will most certainly be baking away (and fingers crossed, continue to bake some good ones!) Anyway, I mentioned earlier that there was a Japanese food author that I'd grown quite fond of; here's one of her dessert recipes that I got round to making on a lazy weekend. My cousin B is quite obsessed with it and almost ate the last piece that had been sitting in my fridge for almost 2 weeks (till mum intervened and binned it).

Ingredients (I've doubled the original recipe which is is Harumi Kurihara's 'Harumi's Japanese Home Cooking') - 200g digestive biscuits, 80g unsalted butter, 500g cream cheese (at room temperature), 180g granulated sugar, 4 eggs, 400ml double cream, 6 tbsp sifted plain, 2 tbsp lemon juice.
First of all, line the cake tins with greaseproof paper (I used one 20cm tin as well as a baby 13cm tin. I do suggest you grease the tins first before you line them - I stubbornly refuse to grease my tins and just line them and it takes absolutely forever because the lining keeps collapsing. It's a really bad habit of mine and it's just one of those things that I keep doing). Place the digestive biscuits in a plastic bag and roughly crush with a rolling pin. Soften the butter and mix with the bread crumbs.
Pour the mixture into the bottom of the tin and press down lightly to make the base (The recipe didn't say to but I put both tins in the fridge to help the base set). Preheat the oven to 170 degrees.
In a bowl, add the cream cheese, beat until soft with an electric mixer then add the rest of the ingredients, in order, mixing each on thoroughly first before adding the next. Continue until the mixture thickens, then pour into the cake tin on top of the biscuit base. Bake in the oven for 45-50 minutes. Remove and leave to cool.
Once it has cooled, remove from the tin, discard the lining paper and leave on a rack to cool completely.
The recipe actually didn't say to chill the cheesecake before eating but I find all cheesecakes taste better after they've spent some time in the fridge.
As is the case with all Japanese cheesecakes, this one was light to the taste and you could very easily eat a lot of it in one go. I had a generous slice served up with some fresh blueberries but this is one you can easily eat plain by itself.

Anyway, after making this cheesecake, I promised my cousin B to make his chocolate cheesecake for his birthday. Post to follow!

Friday, 29 January 2010

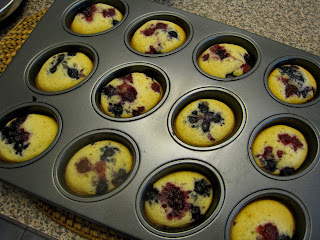
mixed berry friands

I popped by my old blog the other day and scrawled through entries posted almost 4 years ago and noticed how often I baked friands. I seemed to alternate between blueberry friands and raspberry friands; it's no wonder that the boy started to get addicted to them. And well, you'd think that after so many times baking friands, I would've got the recipe spot on but to this day, I'm still trying to get it right. Here's a batch of mixed berry friands (a good compromise between blueberry and raspberry friands) that were cooked on the 'bake' setting on my oven. Usually I use the 'fan forced' setting but found that the sides of the friand were browning a bit too quickly when I wasn't keeping an eye on the oven.

Ingredients - 180g butter, 160g icing sugar, 75g plain flour, 125g ground almonds, 5 egg whites, zest of 1 lemon, 125g mixed berries.
Preheat oven to 200 degrees. Butter a 12 hole friand mould. Melt the butter and allow to cool. Sift the icing sugar into a bowl, and mix in the ground almonds. Lightly beat the egg whites with a fork for 30 seconds, then stir into the dry ingredients. Add the melted butter and lemon zest and stir well. Divide the mix into the friand tin, top with mixed berries and bake in the preheated oven for 15 minutes. Test with a skewer to check if they are ready. When ready, take out of the oven and cool for 10 minutes before unmoulding onto a cooling rack.
On the 'bake' setting of the oven, the friands came out less brown than usual.
On top of the friands being less brown, I also managed to get a full batch of 12 friands. Usually I manage to only get the 9 or 10. The friands stuck to the tin quite a bit this time but that could've been because I was eager to eat one and tried pulling them out of the tin as soon as they came out of the oven. (Usually when you rest for the full 10 minutes, the sides of the friand pull away from the tin so you can just tip the whole tin upside down and they'll fall out).

On the whole, a success because these friands tasted lovely. And I'm out of berries for now so my next batch of friands will be something a bit different!

Monday, 25 January 2010

gingerbread cookies

I think I must've been slightly delirious on December 23rd; I started baking the christmas baubles (last post) and then midway through, I thought it would be a good idea to make some gingerbread men to take to work. Well why not, may as well be part of the Christmas spirit. So whilst putting the finishing touches on the christmas baubles, these gingerbread men were baking away. The recipe was from the Bourke St. Bakery book (yes, another one of my cookbooks!) and looks like most people thought it was a good recipe.

Here's a pic of the gingerbread men in the book. My gingerbread men cutter was slightly smaller but more importantly, got used for the first time after being buried in my bucket of cookie cutters (trust me, I have more than a hundred cutters sitting in a few places in the house).
I could have fridged the dough for a bit longer - notice the thumb prints that I've made as I was transferring it to the baking paper?
Each batch only takes about 15-20 minutes to bake. I had over 1.5kg of dough and only managed to bake half of it that night. Even with half, I made over 40 gingerbread men to take into work the next day.
The decorated gingerbread men - some with their tongues sticking out, others in their undies, others with ties and one even has some clothes on!
By the time I was done and wrapped each gingerbread man into a little bag, it was well into the early hours of the morning. It was worth it though judging by the reaction of everyone that received one and had a taste.

A week on, the gingerbread men were still crisp (provided you keep in an airtight container) and the taste of these gingerbread men certainly earned me a bundle of compliments. For many, it reminded them of the gingerbread men they used to have when they were a little kid and well for me, it was my first time baking them I had a ball of fun. Kudos to the lovely Bourke St. Bakery cookbook, you are really a keeper!

Sunday, 24 January 2010

white chocolate & cranberry christmas baubles

I grudgingly admit that I'm one of those people who take recipes off the recipe pads in supermarkets (by recipe pads, I mean those ones that get cable tied to the shelf and which draw your attention to a particular product). In most cases, I do end up buying the advertised product because I need it to make the recipe but then half the time, I just take the recipe and add it to my collection. And well, I do like hunting them out although you'll find more of them at Easter and Christmas time when Nestle and the other companies are trying to get you to bake a bit more. It's become a bit of a habit and sometimes I find I'm in the supermarket and leaving with a recipe without actually buying anything.

This post is long overdue but this was one of the recipes that I picked up prior to Christmas. I ended baking these for my the last day of work (Christmas Eve) and these worked out to be a quite a treat. They were pretty little things and just the right size to pop a few into your mouth and not feel too guilty.

Ingredients: 4 cups dessicated coconut, 395g can NESTLE Sweetened Condensed milk, 1/2 cup dried cranberries, 2 tsp lemon zest, 180g Plaistowe Extra Creamy Premium White, chopped.
Preheat oven to 180 degrees. Grease and line two baking trays. Combine coconut, condensed milk, cranberries and lemon zest and half the white chocolate in a bowl. Roll level teaspoons of mixture into baubles.
Place baubles on prepared oven trays, bake for 15 minutes or until lightly browned.
Place remaining half of the white chocolate in a bowl, microwave on low for three minutes, or until melted. Drizzle baubles with the melted white chocolate and top with extra cranberries.
Christmas baubles ready to eat!
These baubles are slightly chewy in texture and really aren't too sweet. The best thing about them is that they're extremely easy to make and look fantastic. It's probaby the first time ever that I've baked something that was as Christmasey as this and well, seems like everyone at work enjoyed them (I had an empty box to take home). Thanks to S for helping me get them around the office!

Tuesday, 19 January 2010

double chocolate orange brownies

I do love a good brownie. I remember making brownies for the first time and was surprised by the amount of butter that went into a batch...yep, it's pretty much one block of 250g butter per batch of brownies. I suggest you eat just a sliver if you're after a suger hit but inevitably, the brownie is one that's hard to resist!

I was actually quite excited making this batch of brownies. I'd just been to Victoria's basement and bought myself a slice/brownie tin and well, the recipe was a new one I found in Ravinder Bhogal's 'Cook in Boots' (also a very recent purchase) and well, it'd been awhile since my last batch and this recipe was different but not too different to put me off.

Ingredients: 225g unsalted butter, 225g roughly broken chocolates, 4 eggs, 300g caster sugar, 2 tsp vanilla extract, zest of 1 orange, 2 tbsp orange juice, 1/2 tsp sea salt, 150g plain flour, 1 tsp baking powder, 100g white chocolate chips.
Preheat oven to 180 degrees. Grease and line an baking tin. Put the butter and chocolate into a heatproof bowl over a pan of hot water and leave to melt. In a bowl, beat the eggs and then add the sugar, vanilla, orange zest and juice and salt. Next, fold in the flour and baking powder. Pour in the melted chocolate, throw in the choc chips and give it one last stir.
Pour the batter into the baking tin and bake for 35-40 minutes. Test it with a skewer - it should be thin and crisp on the top, and gooey but not raw in the middle. Leave it to cool before cutting or removing from the tin.
Need I say more?
This recipe is so richly dense that you'll only be able to eat a sliver or two each time. Great thing is that it keeps well in the fridge (up to a week). Simply cut yourself a piece and let it rest to room temperature. Otherwise, my favourite is to whiz in the microwave for 10-15 seconds (depending on the size of the slice) and serve up with plain vanilla icecream.

Whilst the white chocolate chips might seem like an optional item in this recipe, I suggest you keep these in. Once cooked, the white choc chips give it the added texture - a slight chewy crunchiness at the base.

Anyway, there's a number of recipes I want to try in 'Cook in Boots'; stay tuned!

Sunday, 17 January 2010

wok noodle bar @ willoughby rd., crows nest

A few of my weekends in December were spent either in Crows Nest/St. Leonards. I can't remember the reasons exactly but it was either spending time in Victoria's Basement finalising the Christmas shopping or idling in The Essential Ingredient, debating which colour the Kitchen Aid food processor looked better in. And no, I haven't bought myself a Kitchen Aid food processor, though I'd like to and the I think it does look nice in Cream. Need to do some saving up!

So in amongst the loitering in Crows Nest, J&I stopped by for lunch at Wok Noodle Bar on Willoughby Road. J has been quite good lately and reminding me to pick out vouchers from the Entertainment book when we go out and Wok Noodle Bar happened to be in there with a 25% off voucher.

Pad Thai (chicken & prawn) @ $13.50.
Coco chill noodle (seafood) @ $13.50 - mild chilli & creamy noodle dish with big rice sheet noodle, egg and vegetables. The creamy chilli sauce is almost like a curry and the big rich sheets soak it up, leaving you with quite a heavy dish. You can probably share this one between two.
Given we had the voucher, we added a Thai Beef Salad @ $7.50 to share. The ingredients in this salad were fresh and reminded me of my trip to Thailand last year!
I really enjoyed lunch and thought it was a bargain with the Entertainment book voucher. Even without the voucher, the prices are reasonable, the servings are large and service is quick and friendly. Whilst we were there, people were coming in and out, eating in, grabbing takeaway. From what I could tell, it seems like a popular place with the locals.

Anyway, check it out and see what you think. If anyone has a Kitchen Aid food processor, do tell me what you think? I'm keen to see if it's worthwhile getting one.

Saturday, 16 January 2010

bang bang chicken

It just so happens to be that everytime I go to Jo's place I'll end up baking one thing and then bringing along a salad. One might think that the baked goodies would disappear much quicker but it's actually the salad that disappears even faster. My mum doesn't think it's strange though, in her words, 'If people are asked to bring something along, they'll more than likely to bring something heavy or something they've spent a lot of time on cooking. Your salad will be great because there's only so much heavy food that people can eat'. And it's true, each time I've made salad, it disappears straight away and when I pay closer attention, I'm actually the only one bringing salad to the party.

If you're looking for a recipe to make and bring to a party (and subsequently return home with an empty bowl), I highly recommend this one: Jill Dupleix's 'Bang bang chicken'. Quoting Ms Dupleix, apparently 'Sichuan street vendors sold this as a snack, first hammering the chicken with a bang or wooden cudget to loosen the fibres'. Unfortunately, there's no banging involved in this particular recipe but by all means, you can definitely give it a go and have a bit of fun!

Ingredients: 2 chicken breasts, 2 slices peeled fresh ginger, 4 trimmed spring onions, 1/2 peeled cucumber, 1 peeled carrot, 2 celery stalks, 1 tsp sesame oil, 1 tsp rice wine vinegar, 1 tsp toasted sesame seeds. For the sauce - 1 tbsp sesame oil, 2 tbsp peanut butter, 1 tbsp sweet chilli sauace, 2 tbsp soy sauce, 2 tsp caster sugar, 1 tbsp rice wine vinegar, 1 finely sliced small red chilli.

Cook the chicken in a pan with 1 tsp salt, the ginger and enough cold water to cover. Finely shred the spring onions and add half to the pan. Bring to a simmer and poach for 15 minutes. Turn off the heat and leave for 30 minutes, then drain. Cut the cucumber, carrot and celery into matchsticks (suggest you use a sharp knife and be careful of those fingers!)
Finely shred the chicken and combine with the cucumber, carrot, celery and remaining spring onions. Add the sesame oil, vinegar, sea salt and pepper and toss to mix.
To make the sauce, mix all the sauce ingredients until you have a paste. Gradually whisk in up to 100ml water until runny but still quite think. Spoon the sauce over the chicken and vegetables, scatter with toasted sesame seeds and serve.
I had help from J cutting up the vegies into matchsticks. He doesn't think I can use a knife properly (and neither can I) so I let him take care of it. It's actually quite a laborious process cutting up vegetables into fine matchsticks. Before we knew it, a good half hour has passed and what was meant to be matchsticks looked more like crayons. Ah well, chunkier vegetables have crunch so if you're after something with a bit more texture, cut them a bit thicker. You'll find also that once you put on the dressing, it'll soften up the vegetables so if you are making this salad in advance, don't worry too much about having to cut the vegies too finely.

Loved this recipe and will definitely make it again!

Wednesday, 13 January 2010

little berry cakes

My friend Jo invited a bunch of us over for Christmas. After checking in with her to see what she needed help with, I naturally got busy in the kitchen. Usually I spend a good amount of time rummaging through the recipe books looking for the perfect recipe to cook. There's a real art to choosing something that can feed a lot of people and well, Jill Dupleix made it easy for me. My copy of 'Totally Simple Food' was lying around and the 'Little berry cakes' looked like it would be an easy recipe to knock up the night before and feed a large-ish group of people.

Ingredients: 125g softened butter, 125g caster sugar, 3 large eggs, 180g self-raising flour, pinch of salt, 60ml milk, 1/2 tsp vanilla extract, assorted frozen berries.
Heat the oven to 170 degrees. Line 2x12 mini mould trays with paper cases. Using an electric mixer, beat the softened butter and sugar together until smooth. Beat in the eggs one at a time. Sift in the flour and salt, and fold through until well mixed. Finally, stir in the milk and vanilla until smooth. Spoon the batter into the moulds. Drop a single berry on top of each little cake. Bake cakes for 12-15 minutes, or until a skewer inserted in the centre comes out clean.
The recipe recommends you cool to room temperature and dust with icing sugar to serve. I think it can do without; just pop one into your mouth whilst it's hot. Observe large human eating a little berry cake!
I took this with me to dinner the next night. Personally, I thought they tasted better when they came out of the oven. Overnight, the cakes seem to have shrunk into themselves and were quite sticky to hold; the smell of the egg was also quite overpowering. Next time I'll probably just bake them before a party so I can serve them fresh out of the oven. Call me fussy but I'm just not a big fan of overnight cakes!

Tuesday, 12 January 2010

azuma kushiyaki @ george st., regent's place

It seemed like I was forever waiting for the opportunity to try out Azuma Kushiyaki at Regent's Place. I was jumping up and down when the place first opened (excited because I'd been to Azuma @ Chifley for the degustation and given this place fell under the Azuma umbrella, there was much to expect). Then time seemed to drift by and get the better of me, I was reading about the dessert on offer as part of Sugar Hit 2009 at Azuma Kushiyaki (arguably one of the better ones in 2009) and finally, stuck for dinner options one night after work, J&I made our trip over there to check it out.

If you haven't heard about Azuma Kushiyaki, Kushi = skewers, Yaki = Grilled. The place offers a large selection of grilled skewers in addition to some of your more traditional Japanese dishes. I suggest you order as many of the skewers if you're coming here for the first time - they're very much worth it.

Free range Spatchcock platter - grilled thigh, breast fillet & mini drumstick, karaage deep fried wing. Great shared between two as there's mostly two pieces of each assortment, each are worth trying.
Beef Carpaccio - seared rare beef tenderloin (18m old natural grass fed beef from Cape Grim, TAS) & chives with ponzu dressing. Loved the presentation!
This one didn't look anything like the picture on the menu. Seared Tuna Salad served with ponzu vinaigrette (apparently Azuma's famous salad as feature on SBS Food Safari). I haven't been watching Food Safari but for those that do, hopefully you might recognise this?
Here's the tuna from under all the greenery. I actually found the garlic on the dressing very overpowering - it felt like i was eating garlic all the way so be warned.
Sura Ramen - egg noodles in hot and sour soup. I actually quite like the combination of hot & sour soup and Ramen noodles, just that it can be quite filling. One bowl of this is more than enough to fill you up.
And of course, being at Azuma, we needed to try the Azuma Ramen - egg noodles in mildly spiced sesame soup.
Not sure if it was just our luck (the fact all restaurants I've been going to lately need me to vacate a table by a certain time) but once again, we were eating against time at this place. They seem to do the two sittings, 6-8 and 8 till close. We got in on the first sitting without needing to book but were down to the last hour when we sat down. We thought we'd be ok just to grab a quick dinner but then the food actually came out quite slowly with the last ramen coming out at 5 minutes till our sitting was up. We actually had to chase them up for it because they had already previously reminded us that we need to empty the table by 8.

If you're planning to come here, please note that there is a $35 minimum charge per person. We were quite surprised as we only discovered this when we sat down and looked at the disclaimer that sat at the bottom of the menu. It wasn't a huge issue for us given we were keen to try a few dishes but would've been good to know earlier. Service can do with improvement as it seemed to be lacking rather than being bad.

To be really honest, I much prefer Azuma @ Chifley Square. If you've tried both places, let me know what you think!

Monday, 11 January 2010

over the top award

It's taken quite a bit of kicking and pushing from J to get me back into blogging. For awhile, I was quite happy to let the photos build up and in some instances, stop taking photos when I was out eating out and very occasionally catch up on a post or two when I felt like it. Well the boy didn't give up and more importantly, my readers hadn't given up. Thanks to all my dedicated readers especially Mademoiselle Delicieuse of Spoon, Fork & Chopsticks who's awarded me the 'Over the Top' Award. Thanks chick, this is a real honour and you've been a real inspiration when it comes to all things food and giving me the final shove to get back to blogging.

According to the rules of this award, I must provide readers with the answers to the thirty-five questions below in one word. I also must thank my award-giver for this fun award (Thanks Mademoiselle Delicieuse!) and grant six of my favourite bloggers this award, then give them the heads-up that they have been nominated.

Here are the blogs I'm nominating:

Here are my answers:

  • Where is your cell phone? Desk
  • Your hair? Tied
  • Your mother? Fantastic
  • Your father? Sleeping
  • Your favourite food? Japanese
  • Your dream last night? Nightmare
  • Your favourite drink? Green Tea
  • Your dream/goal? Cafe
  • What room are you in? Bedroom
  • Your hobby? Cooking
  • Your fear? Birds
  • Where do you want to be in six years? Cooking
  • Where were you last night? Sagunja
  • Something that you aren’t? Annoying
  • Muffins? Favourite
  • Wish list item? Holiday
  • Where did you grow up? Sydney
  • Last thing you did? Blog
  • What are you wearing? Pyjamas
  • Your TV? Off
  • Your pets? None
  • Friends? Crucial
  • Your life? Challenging
  • Your mood? Sleepy
  • Missing someone? Yes
  • Vehicle? Sometimes
  • Something you’re not wearing? Jewellery
  • Your favourite store? Patisserie
  • Your favourite colour? Blue
  • When was the last time you laughed? Yesterday
  • Last time you cried? Movie
  • Your best friend? Amz
  • One place that I go to over and over? Bookstore
  • One person who emails me regularly? J
  • Favourite place to eat? Home
Thanks again Mademoiselle Delicieuse! I love your blog and am extremely grateful for this award!!!

Thursday, 7 January 2010

banana bread

In case your wondering that I bake every day (or even more than a couple of times each day), I don't. I'd like to though... I actually find it quite relaxing baking and just concentrating on what's in the oven and not having to think about anything else. And well, when the oven time is up, there's usually the treat to devour which makes baking time even better. At the moment, I've been back to baking roughly once a week although over the Christmas break, I was close to baking two things every day. (There's assorted baked pieces lying around the house which I'll probably have to chuck out soon because I did go a little over board but well, it was Christmas!)

Here's a banana bread recipe from Jill Dupleix's 'Simply Food'. I think the first time I heard about Jill Dupleix was reading Sarah's blog, which by the way is one of my favourite blogs to read. Anyway, Jill Duplex is known for her simple, no-fuss yet irresistable recipes. This banana bread recipe is quite a treat.

Ingredients: 250g plain flour, 2 tsp baking powder, pinch of salt, 3 ripe bananas (approx. 450g), 125g melted butter, 150g caster sugar, 2 large eggs, 1/2 tsp vanilla extract. Optional - 50g chopped walnuts.
Lightly butter a 25x10cm loaf tin. Sift the flour, baking powder and salt into a bowl. Mash the bananas to a puree. Cream the butter and sugar together in a bowl, until smooth and pale. Add the eggs one at a time, beating until just combined. Fold in the mashed bananas, vanilla and walnuts if using, then lightly fold in the flour. Spoon the mixture in the loaf tin and bake for 1 hour (covering the top with foil if it starts to brown to quickly). Allow to cool for 20 min before turning out.
Serve warm or at room temperature, cut into thick slices.

I like having banana bread for breakfast or as a late afternoon snack. They're great toasted in the toaster (try not to kill yourself trying to wedge the piece out with a knife which is what I tend to do and get told off for every single time) and most definitely luscious when served with a generous spread of butter. The only thing I'd say lacking about this recipe is that the banana bread didn't brown inside as much as other banana bread recipes do. I definitely used ripe bananas and whilst the outside browned quite nicely, the inside looked more like a butter pound cake. And when you compare it to the picture that's in the recipe, they actually look nothing alike on the inside. Can anyone shed any light on why banana bread browns usually and not in this recipe?