Monday 25 October 2010

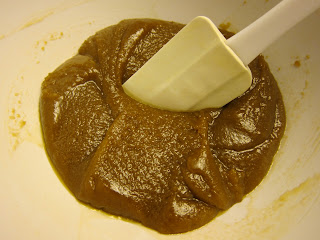
coconut & cherry banana bread

I remember when I was a teenager, my mum used to tell me that I didn't need so many clothes and that I should save my money for other things; that no one is really going to remember what you wore the other day or last week. It took me awhile to see the point in her logic and to this day, I'm still guilty of splurging on extra clothes that I don't need but well, that's all part of being a girl! Over time though, I have gotten a lot better and yes I might be looking a bit daggy in my reworn clothes but hey, like mum said, no one has actually commented or said a thing!

Now with books, that's a completely different matter. It's actually only been in the recent couple of years that I've started hoarding my cookbooks and now they are overspilling off the bookshelf and onto the floors. All my bookshelves are full now and I've taken to arranging them in neat 'big' piles and well, I tried to stop myself from buying them but unlike clothes, each and every cookbook is so very unique that it's really quite hard to say no. Well as I'm struggling to stop myself from buying them, the only other solution is to use them and hey presto, that's exactly what I'm doing!

My go to recipe book at the moment is Nigella's 'Kitchen'. Here's an extremely easy recipe for coconut & cherry banana bread.

Preheat oven to 170 degrees. Line a loaf pan with baking paper. Melt 125g unsalted butter in a saucepan and take it off the heat. Peel and mash 3 medium sized bananas in a small bowl. Beat 150g caster sugar into the cooled, melted butter, then beat in the mashed bananas and 2 eggs. Fold in 175g plain flour, 2 tsp baking powder and 1/2 tsp bicarb soda. Finally, add in 100g dried cherries and 100g dessicated coconut. Fold well so that everything is incorporated, then pour into the lined loaf pan. Bake for 50 minutes, check with a skewer to see if the loaf has cooked through (the skewer should come out of the cake clean).

Once out of the oven, leave it in the tin for 10 minutes. Then carefully slip the cake out of the tin onto a wire rack to cool. Slice away and eat!

I mentioned I was in love with frozen cherries, well I'm quite the bit in love with dried cherries (this was the bag I picked up at Sweetness the other week after a lengthy trawl through Sydney looking for them). Used in the loaf, the dried cherries don't taste the least bit dry at all. Through the baking process, they seem to plump up and absorb a bit of water (sort of like when you soak raisins/currants in water and they come up rather juicy). Great thing is that I hardly made a dent to the bag of cherries so I have plenty more to experiment with, the cherry chocolate cookies I was thinking of the other day might just be it!

Sunday 24 October 2010

houlihans cafe @ victoria ave., chatswood

Gosh it's been awhile! It's been awhile since I've been to Chatswood and definitely a long while since I've been to Houlians. They were shut for renovations for a bit last year and well, I think that's when I stopped going to Chatswood for lack of better place to eat. Glad they've reopened, and food is just as great as ever (if not better). It's a much brighter place if you sit inside otherwise there's the seating outside  (which I tend to avoid cause of the traffic), the menu has also had a good revamp and the smell of coffee as you sit inside is really quite lovely!

Nothing like a juicy beef burger to quench the hunger!

I always think that a chicken burger is healthier than a beef burger but beef burgers tend to more much more juicy and flavoursome.

A rather excited eater!

Service is really quick and friendly, and their breakfasts (which people were ordering around us even though it was lunchtime) looked rather delectable! Seems like Houlihans is the place to be - have bumped into someone everytime I've eaten here and this trip was certainly no exception. There's plenty more menu items I want to try so maybe I'll see you there next time!

Wednesday 20 October 2010

double chocolate expresso & cashew cookies

Whether I'm having a good day or a bad day, I like to bake chocolate cookies. Choc chip cookies are usually my first port of call, preference is for dark chocolate but milk and white chocolate go rather well too. And well, when I have all three types of chocolate at home, it only makes sense to do a combo of all  three! At the moment, I only have dark chocolate chips at home and it was after making the congo bars (in my previous post) that I came across this recipe double chocolate expresso & cashew cookies (it's the recipe before the congo bars) in David Lebovitz's 'The Great Book of Chocolate'.

Preheat oven to 160 degrees. Line baking trays with baking paper. In a large bowl, cream together 230g softened unsalted butter, 200g caster sugar and 180g light brown sugar until fluffy. Add in 2 eggs, 1 tsp vanilla extract, and 2tsp expresso powder. Mix well.

Sift into the mix 280g plain flour, 65g cocoa powder, 1 tsp baking soda and 1 tsp salt. Stir together. Add in 100g toasted unsalted cashews (stupid me didn't toast my cashews thinking that the roasted cashews where already 'toasted' anyway but they are not, they are almost no different to using the raw ones) and 100g chocolate chips.

Scoop the dough into balls and arrange them on a baking tray at least 4cm apart. Bake for about 20-25 minutes, turning and rotating the baking trays as necessary to ensure even baking. Really keep an eye on these cookies when they are in the oven as I went and burnt a few - they burn so quickly and you actually don't realise it because of how dark the cookie dough is.

Let cool for about 10 minutes before transferring from the baking sheet to the cooling rack.

Recipe says it should make about 24 cookies (give or take a few for me as I started burning a few)

Gobble up a few and do share with others - pack into airtight containers to keep them fresh.

These cookies were crunchy with a slighly chewy centre. It's a shame I didn't toast the cashews as it would've given the cookie extra texture and crunch. Untoasted, the cashews will appear to taste a little stale but if you're not looking for it, you probably won't notice it.

At the moment, I'm thinking that bag of dried cherries I bought will go well in a chocolate cookie. Hmmm...let me report back!

Tuesday 19 October 2010

congo bars

This will sound absolutely ridiculous but when I see the word 'congo', I immediately associate it with bongo drums and images of a primitive kind of tribal dance seem to come to mind. I've gone to the extent  of googling the word congo to see if I was correct and well, don't ask me why I make those associations;  probably because the word congo rhymes with bongo and congo does sound rather like a traditional dance - don't you think?

Bizarrely enough, congo bars neither have to do with the place Congo in Africa and from my research, the word Congo seems to be referring to a mythical place which many a place, including this baked goodie have been named after. Maybe one day I will name my recipe the 'Panda Bar' and this will make history like these congo bars!

I've taken this recipe out of my trusty copy of 'The Great Book of Chocolate' by David Lebovitz.

Preheat oven to 160 degrees. Butter and line a 20x30cm baking pan. In a large bowl, mix together 150g melted unsalted butter, 300g brown sugar (I reduced the amount of sugar in the original recipe by 150g) and 3 large eggs. This is what it looks like!

Sift in 385g plain flour, 2 1/2 tsp baking powder and 1/2 tsp salt. Stir in 280g chocolate chips and 130g toasted and chopped walnuts. Spread the batter into the pan as evenly as possible; it's quite a sticky batter and I suggest you use a knife to smooth out the top as a spatula will stick.

Bake for 25 minutes until a golden brown. Remove from the oven.

Let cool for a few minutes and then cut into bars whilst still warm.

These both look gorgeous and taste gorgeous!

Reducing the amount of sugar was definitely a good call as with the adjusted amount of sugar, this bar was already reasonably sweet. David Lebovitz's comments in his book allude to the fact that these bars actually improve a few days when stored at room temperature in an airtight container. I was a bit skeptical at first but after eating these a couple of days later, they were truly as good as new and I didn't even need to whiz them in the microwave. 

As good as it tastes, congo bars are very similar to brownies and are quite heavy in taste so a small slice will go a long way. Suggest you share this tray amongst friends and family!

Monday 18 October 2010

open turkey & mushroom omelette

Amongst my many cooking endeavours (and I'd like to think I've had a fair few), I've also been encouraging the boy to cook. He was reluctant at first and continues to be reluctant but overtime I've managed to weasle out of him a very decent chocolate cake and on a recent weekend, an open turkey & mushroom omelette which was both aesthetically pleasing as it was to eat. I think he still prefers that I cook but a break from the kitchen and getting fed is always something to look forward to!

The boy hard at work concentrating on his chopping. For this omelette, we went through the fridge to see what there was and managed to find ourselves a handful of shitake mushrooms, a brown onion, a bunch of shallot, and some sliced turkey. From my soon to be vegie plot, we grabbed handful of coriander and 6 red chillis. One of the best things about omelettes is that you can improvise and make do with all sorts of ingredients you might have at home - it's actually one of those good recipes to cook when you are in need of clearing out the fridge!

In a small bowl, lightly mix together 4 eggs.

Grate about 150g cheddar cheese.

Start by sweating the chopped onion in a little bit of olive oil. Remove from the pan.

Start by cooking the egg on a low heat (pour all the egg into the pan in one go). Place all chopped ingredients on top of the egg and cook for about 2-3 minutes.

When the egg is about completely set, sprinkle over the top the grated cheddar cheese and heat through till the cheese melts. Most omelettes usually get folded in half before the eggs have completely set; I prefer to have my open omelettes and see what goes in it!

Serve your omelette with buttered toast! 

Eat with a knife and fork, otherwise if you are like J, you can cut up the omelette into slices and eat it like a pizza.

Kudos to the boy for the huge effort and let me just say, this omelette more than adequately feeds two (particularly if you are going to eat it with toast). Admittedly the sliced turkey had a very mild flavour but  a good dose of cracked salt and pepper will easily do the trick!

Sunday 17 October 2010

apricot bars

I have friends that are daunted by the task of baking and whilst I wouldn't call myself a pro baker, I'm reasonably comfortable with using the oven and over time, the oven has become a rather good friend of mine and seems to work with me to get things right. Occasionally, some recipes don't seem to work so well (and here I blame some recipe books that have gone too quickly to print and haven't been road tested) but probably the largest factor in a failed recipe is laziness. It's when I duck upstairs to do something else and forget about watching the oven or in a rush, I forget ingredients (e.g. leave out the sugar) or I do steps back to front and ruin how the ingredients should be incorporated. 

Making this recipe for Apricot Bars from Bill Granger's 'Simply Bill', the mistake I made was one I always make - forgetting to let it cool in the tin before lifting it out of the tray which I guess is only a small thing for an otherwise tasty recipe.

Preheat oven to 180 degrees. In a large bowl, mix together 155g plain flour, 95g brown sugar, 115g caster sugar, 2 pinches of salt and 1 tsp baking powder. 

Rub into the dry mix 175g chilled and diced unsalted butter.

Mix in 130g rolled oats and 90g dessicated coconut.  Reserve a cupful of dough and press the remainder evenly into a lightly greased and lined 20x30cm baking tin. Bake for 15 minutes until golden.

Put 450g chopped dried apricots and 125mL of water in a small pan over low heat and cook, stirring occasionally until the liquid has been absorbed. Cool slightly, then spoon over the baked dough base. Dot 100g apricot jam over the apricots and crumble the reserved dough over the top. Spoon on 40g melted unsalted butter and bake for 30-35 minutes until lightly golden. 

Do what I didn't do - Leave to cool completely in the tray (otherwise what happens is that you'll crack and crumble the base if you try to lift it out of the tray whilst it's still hot).

Slice into squares, eat away and store the rest in an airtight container. Makes 24.

Probably the other daunting thing about baking is that you can never be too sure how your baked goods are going to be received by those that eat it. When these apricot bars first out of the oven, my brother had a nibble (argh, he eats like a rat - there's been times when I've freaked out thinking a rat has got to whatever I've baked because my brother always takes off a corner where you least suspect it) and his comment was that it was 'too crumbly' (which is the case as it needs to cool down before it becomes more solid). I thought these bars tasted quite healthy and this was echoed by my mum and aunt who both prefer a slightly less sweet baked treat. My cousins seemed to prefer the chocolate cookies I made and it was quite consistent that the boys seemed to show an aversion to this apricot bar - probably because it looked to healthy.

Baking really is an art and well, you can never be too sure how it's going to turn out but it's it a bit of fun and I actually find it really interesting what you learn about people's tastes and what they prefer and yes, my brother eats my baked goodies like a rat!

Thursday 14 October 2010

classic blueberry muffins

I have my good days and my lazy days and being lazy is something I do enjoy and making this batch of blueberry muffins was definitely one of those lazy days. Not a whole lot of thought went into picking this recipe, it jumped out at me as I was flicking through for recipes to make and it was just easy because I had all the ingredients at home. And hooray, due to slighly cheaper fresh blueberries being available, this was by default 'the recipe' to make!

This recipe comes out of GoodFood 101 - Cupcakes & Small Bakes by BBC Books. I more or less bagged this one the minute I saw it on the shelf at the shops!

Preheat oven to 200 degrees. Line a 12 hole muffin tin with paper cases. In a large bowl, combine 140g caster sugar, 250g sifted self-raising flour and 1 tsp bicarbonate soda.

In a jug, mix together 85g melted and cooled unsalted butter, 2 large beaten eggs, 200mL milk and 1 tsp vanilla extract. Pour in the flour mix and stir to combine; be careful not to overmix otherwise the muffins will come out of the oven tough.

Fold in 150g punnet blueberries. This isn't a rule persay but I generally find if you are looking at the batter and feeling like you want to eat it whilst it's uncooked, you are going to make a good tasting muffin and this recipe was definitely one of those.

Spoon the mixture into the cases and bake for 15-18 minutes until golden and firm.

Remove from tin.

Cool on a wire rack.

My muffins actually came out of the oven a lot lighter in colour than the ones in the book but were cooked all the way through so I guess the lesson is, don't always trust the pictures in a cookbook; trust your own instincts and if in doubt, checking with a skewer is always the way to go. I've baked muffins so many times now but still always check with the skewer and so far, have a pretty good track record!

Wednesday 13 October 2010

tea on tuesday @ SWEETNESS - the patisserie

It was actually by chance that whilst searching for details on how to get to the Pyrmont Markets that I stumbled across the two events that SWEETNESS - the patisserie were offering as part of SIFF 2010. It worked out well that I then bumped into head chef/owner, Gena who was manning her stall at the markets and I asked her a bit more about the two different events and what they were about (as the SIFF website only gives a brief description of what they are). It didn't take long for Gena to convince me that I needed to book myself into one of these sessions and last night, the boy and I went along to one of her 'Tea on Tuesday' events.

I actually don't have any photos from the night (the boy actually did ask me at some point why I wasn't taking photos) but I think I was too busy enjoying the session and taking in all the info and asking questions that I didn't have time for the camera (plus I was busy gobbling away at Gena's creations). In a nutshell, 'Tea on Tuesday' is a small group session (our session had 8) where you learn about tea and also how you pair tea with dessert. Jen who owns Oscar & Howard Tea took us through 4 different kinds of tea and these were all paired with unique dessert combinations by Gena (all created uniquely for these sessions). Each dessert was exquisite and in my opinion, well matched with the four teas. To be honest, I actually learnt so much about tea in that 2 hour session that I feel slightly sheepish about how little I knew prior. I'd actually thought that 'Orange Pekoe' was an orange flavoured tea but alas no, it's the term for whole leaf tea and nothing to do with oranges at all!

At the end of the session, you get to take home your own blend of tea as well as a goodie bag full of Gena's sweets. Sweets aside, I actually think that the highlight of the evening was getting to meet both Jen from Oscar & Howard Tea and Gena (owner of SWEETNESS) and getting to ask them questions about their business and hear their inspirational stories, then to top it off, take a tour of SWEETNESS' kitchen and see what happens back of house. I'm rather jealous of Gena's collection of Kitchen Aids and still giggle when I think of Gena calling marshmallows 'sexy food'!

The boy ended up being the only boy there that night but I think he had fun. He did get a little hungry as the session runs from 7-9pm but as soon as he stepped inside the SWEETNESS kitchen, his eyes were roving around the room spotting where all the sweets were and I had him ask me whether I thought anyone would notice if he took a piece of marshmallow from one of the bowls sitting under the bench. I just shook my head.

And it whilst we were touring the shop that I noticed that Gena was selling dried cherries in her 'Larder'. FYI: In addition to all the baked goodies on offer, Gena now has a 'Larder' where she sells a selection of the ingredients she uses in her baking. I've been searching far and wide for a pack of dried cherries and pleaded with Gena to sell me her last bag which she kindly did.

So after  a sensational two and half hours (as the boy and I were early) and somehow ended up being the last to leave (probably because I couldn't stop asking questions to both ladies - sorry to keep you both back at the shop!), I've booked the boy and I in for Sweet Expressions which is the other event hat Gena is offering this month. She's explained it a couple of times now what the session is about and I'm mighty looking forward to it so hopefully will have something to share at the end of the month! I believe there's still spots available for both events so get in there quick if you can!

Tuesday 12 October 2010

shredded duck & chilli noodle salad

They say that you either have a sweet tooth or you don't - I definitely have a sweet tooth and if you follow the pattern of my blog posts, you can see that I can hardly stop myself from baking! I really enjoy it and it's an activity that will keep me happily occupied for hours, if not days. I still remember they time I spent a continuous 13 hours baking and icing cupcakes and I hardly felt the time go by. I do miss those those days!

Well, baking aside, every now and then I do need to resurface for something to eat and behind pastas, my second favourite thing to make are salads. I love the combination of fresh flavours and just how versatile salads can be; you can mix and match with the ingredients you have at home, and if you're feeling particularly adventurous, you can combine a whole load of different ingredients to make your very own salad. I guess I wasn't too adventurous with this one, just happened to stumble across the recipe as I was doing a minor clean up of my room (argh, let's say I didn't get very far with the cleaning!)

This recipe comes out of Donna Hay's 'Pasta, Rice & Noodles' and I've followed the recipe quite closely with a few changes here and there - FYI: I have just managed to completely fill a 60L container with all of Donna Hay's magazines and cookbooks; I absolutely adore her!

Place 150g vermicelli noodles in a bowl and cover with boiling water. Allow to stand for 5 minutes or unit soft. Drain.

I was down to my last pack of Luv-A-Duck Peking Duck Legs which I bought at the Good Food & Wine Show this year. Only takes about 15 minutes in a mini oven to reheat at a temperature of 170 degrees.

This salad is actually really easy to make. Not that much chopping and if you have a mezzaluna, chopping actually becomes quite fun. You'll need about 1 cup chopped coriander leaves and 1 cup basil leaves.

To the drained noodles, add in the chopped coriander and basil, 6 chopped small red chillies, 1/3 cup roasted peanuts (as I was using the oven, I simply toasted these in a pan over the stovetop - it's much quicker but the pan also heats up very quickly so you'll need to be careful not to burn them; don't do what I did although a slightly burnt peanut does seem to add a tolerable smokiness to the salad).

Add in the sliced duck.

Combine 60mL lemon juice (as I didn't have lime at home), 60mL fish sauce with 2 tbsp brown sugar to make the dressing. Pour over the noodles.

Recipe is meant to feed 4 but I actually think it's just enough for two if you are having this as a main meal. The original recipe from the book also asks for mint and green chillies which I didn't have at home but my version seemed to turn out rather well without them (hence why I love making salads - you don't exactly have to have everything as per the recipe for it to turn out ok).

As with all salads, I find they do tend to leave me feeling a little peckish later in the afternoon and this one was no exception. Could've definitely made more and eaten more but next time! 

Monday 11 October 2010

lemon & blueberry teacakes

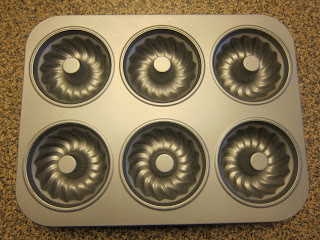
I definitely take after my parents and love looking for a bargain but to give credit where it's due, mum found this mini bundt tin when she went shopping on a weekend at Aldi and I absolutely love it! It's probably a couple of months back now when Aldi had these on special and they were only $4 each. There were a few other different shapes which mum kindly bagged for me and well, they've been sitting on my shelf waiting to be used. Well, what better way to test the bundt pan than with the recipe for lemon & blueberry teacakes I found in 'The Ottolenghi Cookbook'!

The quality of the pan is fantastic (I forget the brand now) but the thickness and sturdiness of the pan is comparable to your Baker's Secret & Wiltshire pans. Start by preheating the oven to 170 degrees. Leave the 6 hole mini bundt pan and 1 large bundt pan in the fridge for a few minutes, then remove and brush with plenty of melted butter. Return them to the fridge.

In a large bowl, cream together 280g unsalted butter and 280g caster sugar together until pale and fluffy. Break 5 eggs into a cup and mix lightly with a fork, gradually add the eggs to the butter mix, beating well until each addition has been fully incorporated. Once all the egg is incorporated, gently fold in 280g ground almonds and 65g plain flour. Add in the grated zest of 2 lemons, 100ml lemon juice (which works out to be the juice of 2 lemons) and 120g fresh blueberries. Be extra gentle when you fold in the blueberries so they don't break.

Take the moulds from the fridge. Spoon the mixture into the tins, reaching all the way up to the edge. You will fill exact 1 large bundt tin and make an additional 6 mini bundt cakes. Bake the small cakes in the oven for about 30-35 minutes, the large cake will take roughly 50 minutes. 

Best way to check if they're ready is to test with a skewer inserted into the centre of the cake, making sure it comes out clean. Remove the cakes from the oven and let them in their tins for 10 minutes.

Then turn out on to a wire rack and leave to cool completely.

The recipe in the cookbook actually also has a lemon glaze which I thought was unnecessary. You'll end up gobbling up the cakes in the time it takes to make the glaze and this is literally what happened. I started eating one, then I had one cousin come over, I sent them home with 4 mini bundts, my aunt and mum shared one, then another cousin comes over and I send them home with the big bundt.

The texture of this cake is deliciously moist and there is a good pairing of the sour of the lemons with the sweet of the blueberries. My uncle tells me that the big bundt was gobbled up overnight as it was that delicious; I would've been keen to see how the texture of the big bundt turned out and whether it had cooked evenly.

Well mum is keen on me making this one again because she's a big fan of citrus flavours (lemon is probably her favourite) and well, after dividing the bakes amongst the various family members, we all ended up having very little. It's a good thing that berries have been reasonably cheap lately so costwise it won't be too expensive and to be quite honest, it's a real luxury to use fresh blueberries for baking. It's not like using frozen blueberries where you have them defrosting as you mix streaking the cake with colour and then subsequently leaving the cake a little undercooked/running when the frozen water seaps out during baking. Fingers crossed that berries stay cheap for a little longer!